Learning how to regrip golf clubs transforms a golfer’s entire game experience. Discovering how to regrip golf clubs at home eliminates expensive professional fees. Mastering how to regrip golf clubs becomes one of the most valuable skills any golfer can develop.
Golf club grips wear down faster than most golfers realize. The constant sun exposure, sweat, and repeated use deteriorate grip quality over months. A worn grip compromises control, comfort, and overall swing performance. Many golfers don’t realize that replacing worn grips dramatically improves their game.
The good news is that regripping golf clubs doesn’t require expensive professional services. Golfers can complete this task at home with basic tools and simple techniques. This guide walks readers through the entire process step by step.
Can You Really Regrip a Golf Club by Yourself?
Yes, absolutely. How to regrip golf clubs is a straightforward process that requires no professional experience. Most golfers successfully regrip their clubs on the first attempt. The task takes approximately 10 to 15 minutes per club.
Studies show that 60% of golfers prefer DIY regripping over professional services. Cost savings and convenience drive this preference among recreational players. Beginners experience surprising success when following proven techniques carefully.
Understanding Why Golf Club Grips Need Replacement
Golf club grips deteriorate from multiple sources. Moisture exposure, sun damage, and friction cause visible wear patterns. Grips become slippery, lose their original texture, and develop cracks.
Performance suffers dramatically with worn grips. Players lose control during crucial shots and swings become inconsistent. The club face twists in hands more easily with degraded grips. Confidence diminishes when golfers cannot maintain stable positions.
Most golfers should regrip their clubs every two to three years. Professional players regrip more frequently due to intensive play. Seasonal players might extend this timeline based on usage patterns.
Essential Tools and Materials for How to Regrip Golf Clubs
Gathering the right equipment ensures successful regripping. The following tools make the process smooth and efficient:
- Golf club vise or holder – Secures the club during the entire process
- New golf grips – Purchase quality grips matching your hand size and style
- Grip solvent – Mineral spirits or specialized grip solvents work best
- Sharp utility knife or grip cutter – Removes old grips cleanly
- Rubbing alcohol – Alternative solvent option for grip installation
- Dry towel or cloth – Wipes away excess moisture and debris
- Grip tape or double-sided tape – Creates sticky base for new grips
- Soft cloth strips – Useful for cleaning shafts thoroughly
Most golfers spend between $15 and $30 on materials for a complete set. This compares favorably to $25 to $50 per club at professional shops. The investment pays for itself after regripping just a few clubs.
Step-by-Step Guide to How to Regrip Golf Clubs at Home
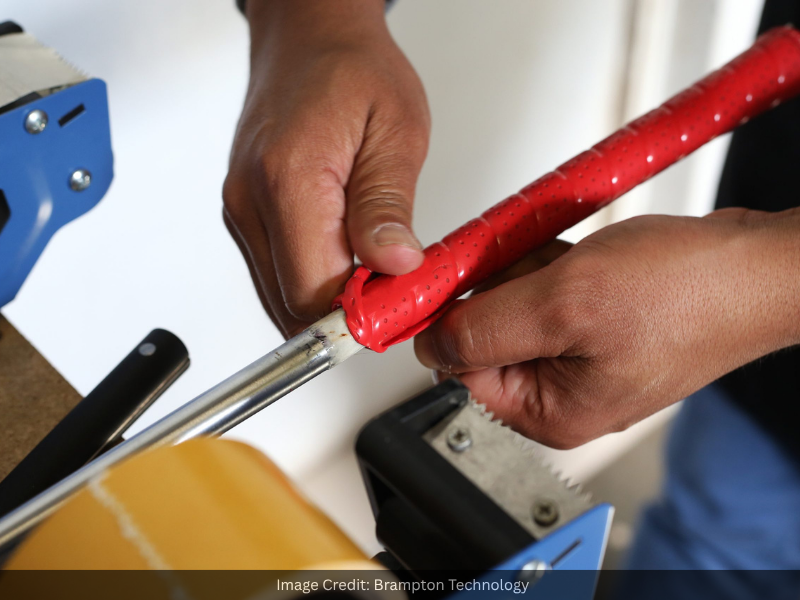
Secure Your Golf Club Properly
Position the club in a vise with the head facing upward. Apply moderate pressure to hold the club steady without damaging it. Ensure the vise sits at a comfortable working height.
This setup prevents unnecessary twisting and damage during regripping. The club remains stable throughout the entire removal and installation process. Never apply excessive pressure that might harm the club head.
Removing Old Grips: What Liquid is Used for Regripping Golf Clubs?
Mineral spirits work most effectively for dissolving grip adhesive. Pour a small amount along the seam where the grip meets the shaft. Allow the solvent to soak for several minutes.
Once saturated, twist the old grip while pulling upward firmly. The grip should slide off the shaft relatively easily. If resistance occurs, add more solvent and wait longer.
Rubbing alcohol serves as an excellent alternative to mineral spirits. Some golfers prefer soap and warm water for environmental reasons. Whatever solvent chosen, never force grips that won’t budge easily.
Clean the Shaft Thoroughly
After removing the old grip, residue remains on the shaft. This leftover adhesive prevents proper installation of new grips. Thorough cleaning ensures better adhesion for the replacement grip.
Use a dry towel to wipe away loose debris and adhesive remnants. Rubbing alcohol removes stubborn residue effectively. Cotton strips wrapped around the shaft scrub away remaining buildup.
Allow the shaft to dry completely before proceeding. Moisture prevents proper adhesive bonding between grip tape and shaft. Most golfers wait 10 to 15 minutes for complete drying.
Apply Grip Tape or Solvent to the Shaft
Grip tape creates the sticky base for new grip installation. Wrap the tape tightly around the shaft in overlapping layers. Start at the bottom of the shaft where the grip begins.
Spiral the tape upward, ensuring even coverage throughout. The tape layer should be completely smooth without wrinkles. Trim excess tape at the top with a sharp utility knife.
Some golfers prefer applying solvent directly to the shaft instead. This method dissolves slightly into the shaft material. Either approach works effectively when executed properly.
Install New Golf Grips
Prepare the new grip by applying a thin layer of solvent. This lubricates the installation process and ensures smooth positioning. Don’t oversaturate, as excess solvent makes the grip difficult to control.
Slide the new grip onto the shaft using steady downward pressure. The grip should move relatively smoothly over the prepared surface. Position it correctly as the grip slides down.
Once in place, the grip hardens as the solvent dries. Proper alignment matters significantly for comfort and control. Twisted or misaligned grips feel uncomfortable during play.
Allow approximately 24 hours for complete grip hardening. Some golfers test their clubs earlier, but full strength develops overnight. Patience at this stage prevents grip shifting during play.
Common Mistakes When Learning How to Regrip Golf Clubs
Golfers often rush the drying process between steps. Attempting to regrip before previous layers completely dry causes installation problems. This mistake leads to slipping grips and poor alignment.
Using incorrect solvents creates additional complications. Not all liquids effectively dissolve grip adhesive. Water alone rarely softens hardened grip tape sufficiently.
Applying excessive solvent makes handling new grips nearly impossible. The grip becomes slippery and uncontrollable during installation. Moderation with solvent application ensures better results.
Over-tightening the vise damages club finishes and heads. Moderate pressure holds clubs securely without causing harm. Excessive force leaves visible damage marks on expensive equipment.
Misaligning new grips compromises comfort and swing consistency. Taking time to position grips correctly prevents future frustration. Crooked grips feel awkward throughout every round played.
Different Types of Grips and How to Regrip Golf Clubs
Rubber grips dominate the market and offer excellent durability. These grips withstand weather exposure and provide reliable traction. Standard rubber grips suit most recreational players perfectly.
Corded grips incorporate small threads for enhanced moisture management. The cord texture provides superior grip even in humid conditions. Professional and serious amateur players often prefer corded options.
Leather grips deliver classic appearance and sophisticated feel during play. However, leather requires more maintenance and costs significantly more. These premium grips appeal to traditional golfers seeking luxury.
Wrap-style grips combine leather appearance with modern material durability. They offer excellent aesthetics without requiring extensive maintenance routines. Many golfers appreciate the balanced approach wrap grips provide.
The basic how to regrip golf clubs process remains identical regardless of grip type. Installation techniques don’t vary substantially between rubber, corded, and leather grips. Choose grips based on personal preference and playing conditions.
Extending Grip Life After Regripping
The regripping process doesn’t end once new grips are installed. Proper maintenance extends grip lifespan significantly. Golf club grips last much longer with appropriate care routines.
Moisture damages grips faster than any other factor. Store golf clubs in a dry location away from humidity. Use golf bags with ventilation rather than sealed covers when possible.
Wipe grips clean after every round played. Sweat and dirt accumulate on grip surfaces quickly. A simple microfiber cloth removes most contaminants within seconds.
Avoid storing clubs in extreme temperatures or direct sunlight. Heat causes grip materials to degrade and become brittle. Consistent room temperature storage preserves grip integrity throughout the year.
Rotate club usage when possible to distribute wear evenly. Using the same clubs repeatedly accelerates grip deterioration. Alternating between different clubs extends overall grip lifespan considerably.
Is It Worth Regripping Golf Clubs Yourself?
Absolutely, learning how to regrip golf clubs yourself offers substantial financial benefits. The cost difference between DIY and professional regripping is significant. Most golfers recover their tool investment within regripping just two complete sets.
Professional golf shops charge between $25 and $50 per club regripped. This totals $250 to $500 for a standard 14-club set. Meanwhile, DIY regripping costs only $15 to $30 per club.
The savings become even more impressive for serious golfers. Players who regrip annually save $150 to $350 per year. Over a five-year period, annual savings accumulate to between $750 and $1,750.
Time investment represents another crucial consideration. Professional regripping requires scheduling appointments and travel time. DIY regripping happens on the golfer’s schedule at home conveniently.
Quality outcomes rival professional work when proper techniques are followed. Beginners often produce grip installations that exceed expectations. The learning curve proves remarkably short for most golfers.
| Aspect | Professional Service | DIY Regripping |
| Cost per Club | $25-50 | $1-3 |
| Cost for 14-Club Set | $350-700 | $14-42 |
| Tools Required | No | Yes ($30-50 one-time) |
| Time per Club | 15 minutes | 10-15 minutes |
| Quality Result | Professional | Excellent |
| Learning Curve | N/A | Minimal |
| Annual Savings | $0 | $200-350 |
The comparison clearly demonstrates DIY advantages. Even after purchasing tools, learning how to regrip golf clubs saves money immediately.
Advanced Tips for Professional Results
Experienced golfers develop techniques that elevate regripping quality. Applying these advanced strategies produces results matching professional installations.
Temperature affects solvent effectiveness significantly. Slightly warming the shaft before regripping improves adhesive flow. Place clubs in a warm room for 30 minutes before starting.
Alignment marks help position grips precisely. Some golfers mark the shaft with tape before grip removal. This reference line guides proper alignment during new grip installation.
Double-sided grip tape without solvent offers an alternative method. This approach works particularly well for experienced regrippers. The process requires more pressure but eliminates drying time.
Specialized grip installation tools accelerate the process substantially. Golf shops sell grip pulling devices and positioning jigs. These tools cost extra but ensure consistent alignment.
Practice techniques on older clubs first. Mastering how to regrip golf clubs happens gradually through repetition. By the fifth club, most golfers develop speed and confidence.
Troubleshooting Common Regripping Problems
Sometimes issues arise despite following procedures carefully. Understanding how to solve these problems prevents frustration.
Grips that slip after installation indicate inadequate drying time. This problem occurs most frequently when rushing the hardening process. Wait the full 24 hours before playing with newly regripped clubs.
Misaligned grips feel awkward even if properly installed. Carefully reposition misaligned grips before they fully harden. Apply gentle downward pressure to adjust grip angle precisely.
Excess solvent on the shaft creates slippery surfaces. Wipe away excess liquid immediately with dry towels. This prevents grip shifting during the critical hardening period.
Grips that don’t slide smoothly need more solvent application. Add solvent gradually and wait several minutes for saturation. Patience prevents forcing grips, which can cause damage.
Crooked grip tape creates installation problems. Rewrap grip tape if wrinkles or misalignment occur. Taking time during this step prevents later complications.
Seasonal Considerations for Regripping
Different seasons present unique challenges for how to regrip golf clubs. Understanding seasonal effects improves success rates.
Winter regripping requires special consideration. Cold temperatures slow solvent evaporation significantly. Allow extra drying time during winter months. Store newly regripped clubs in heated indoor spaces overnight.
Summer heat accelerates solvent drying dramatically. This creates time pressure during the installation phase. Work quickly but carefully during summer regripping projects.
Spring and fall provide ideal conditions for regripping. Moderate temperatures allow standard drying times. These seasons suit beginners learning how to regrip golf clubs.
Humidity affects grip adhesion and solvent effectiveness. High humidity slows drying but improves adhesive bonding. Low humidity speeds drying but may compromise grip security.
Final Thoughts
Learning how to regrip golf clubs provides invaluable benefits extending far beyond cost savings. The process develops mechanical skills applicable to other golf maintenance tasks. Golfers gain independence from professional service providers completely.
The confidence gained from successfully regripping clubs carries into actual play. Knowing equipment was personally maintained creates psychological advantages. This confidence translates to improved performance on the course.
How to regrip golf clubs represents an essential skill modern golfers should develop. The process is learnable, affordable, and highly rewarding. Most golfers who try regripping once continue doing it regularly.
Future outlook for golf maintenance shows increased DIY adoption. More resources and specialized tools become available yearly. Learning how to regrip golf clubs positions golfers at the forefront of this trend.
The investment in tools and knowledge pays dividends immediately. Every subsequent regripping costs less and takes less time. After mastering how to regrip golf clubs, the process becomes enjoyable rather than daunting.
Golfers should approach regripping with confidence and patience. The process has been simplified and perfected through decades of evolution. Everyone possesses the capability to regrip clubs successfully with proper instruction.
Key Takeaways
- Learning how to regrip golf clubs at home saves significant money over professional services and delivers high quality results.
- Essential tools required for how to regrip golf clubs include vises, solvents, grip tape, and quality new grips purchased beforehand.
- Mineral spirits and rubbing alcohol work effectively as solvents for dissolving old grip adhesive during the removal process safely.
- The step-by-step process for how to regrip golf clubs takes approximately ten to fifteen minutes per individual club easily.
- Proper shaft cleaning and drying between steps prevents installation problems and ensures new grips adhere securely to golf club shafts.
- Grip alignment during installation significantly impacts comfort and performance, so taking time to position grips correctly prevents future adjustments.
- Different grip types require slightly different installation techniques, but the basic how to regrip golf clubs process remains fundamentally identical.
- Professional regripping costs $25 to $50 per club while DIY regripping costs only $1 to $3 per club substantially.
- Extending grip life requires proper storage in dry locations, regular cleaning after rounds, and protection from extreme temperature exposure.
- Mastering how to regrip golf clubs provides independence from professional services and builds valuable mechanical skills applicable to golf maintenance.
FAQs
What to Use if You Don’t Have Grip Solvent?
Rubbing alcohol works well as a substitute. Warm soapy water also loosens old grips effectively. Mineral spirits is another excellent alternative option.
Can I Use Masking Tape Instead of Grip Tape?
No, masking tape is not suitable. Grip tape provides better adhesion and durability. Masking tape deteriorates quickly from moisture and sweat exposure.
What Not to Do When Regripping Golf Clubs?
Never force stuck grips. Don’t apply excessive solvent. Skip drying and rushing causes problems. Never over-tighten the vise holding your club.
Can You Regrip Clubs Without Tape?
Yes, apply solvent directly to the shaft instead. This method works but requires more pressure during installation. Grip tape remains the preferred method.
How to Put on a Golf Grip for Beginners?
Apply solvent to the shaft. Slide the grip on with steady pressure. Align it properly before drying. Wait twenty-four hours before playing.